Friday, July 30, 2010

"That's What He Said" Fridays

Welcome to another new post for the week! I am in LOVE with quotes! I have subscribed to Real Simple's Daily Thoughts, they send a quote every weekday (Monday through Friday)! And it totally rocks, such inspiration to start your day off with.


(Click the picture to link to the original owner)

Here is a quote from a couple weeks ago that I just loved:

"All great things are simple, and many can be expressed in a single word: freedom; justice; honor; duty; mercy; hope"
-Winston Churchill

I just love it and it is so true! I hope to inspire you all to have a happy day and weekend!

Wednesday, July 28, 2010

Fun with Mod Podge

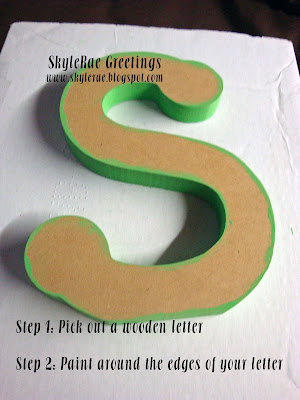
So I know you've been seeing them all over the place. Those cute little letters that are all fancy-fied, with paper, embellishments and Mod Podge! Well I decided hey that would look super cute in my very dreary and dull cubicle at work. And then I thought hey other people may want to know how I did this so I've included instructions!

MATERIALS:
-designer paper by Basic Grey Pheobe
-mod podge
-wooden letter
-acrylic paint
-hot glue
-fabric flowers (paper ones are good too!)


Here is my "S":


Step 5: Use your stencil to cut out various plain and patterned papers for your letter (I used 3, and forgot to take a picture of this step!)


To attach the embellishments I used hot glue, and just glued the separate layers together of the flowers and then the button on top and then stuck it to the "S". I also used hot glue to attach the ribbon to the back of the letter. It seems to have worked out just fine!

I hope everyone has enjoyed this little tutorial! And I really hope you enjoy making your own letters for you or your loved ones! They make excellent gifts!

Hope this makes everyone's hump day go by a little quicker so we can get to the weekend! And don't forget to post your projects back here so that I can go take a look at what you are creating!

Tuesday, July 27, 2010

Challenge Tuesdays!

Hey guys are you liking the new themes for the different days of the week so far! I am really enjoying posting about them! So as you can see Tuesdays are going to be about challenges! This Tuesday I chose to do the Christmas Stampin All Year Long Challenge!

I have been watching this challenge for a while now, so I think it's about time that I begin participating in the challenges! Plus there is no down side, I get my Christmas cards done throughout the year, rather than waiting until November, or dare I say it December!

This weeks challenge is to use buttons and bows as your embellishments! How cool is that! I had a lot of fun with this challenge so here is my take on it:


 To make my card I used:
-designer paper by the Paper Studio
-cranberry ink by Color Box
-ribbon from the stash
-holographic embossing powder
-buttons from my stash


This challenge was a lot of fun, and it gave me a chance to practice my bow makin' skills! I'm getting pretty good if I do say so myself!

One day I will have to post a tutorial on how I do my bows! But that's another day.

Hope you enjoy!


Hope you guys will check out the Christmas Stampin All Year Long blog and participate too!


Monday, July 26, 2010

Start the Week Off Right

I've got another surprise for you all! Another new series for you guys, I'm going to call it "Start the Week Off Right!" And every week I will give you a health tip, beauty tip, or recipe! I'm really excited to start this off. So I will start this series off with a little sun safety!

I have to tell you where this comes from. Last weekend we were out 4-wheeling in the mountains, and dumb dumb me didn't wear sunscreen. It was very stupid of me and trust me I have painfully paid for it!

According to the American Cancer Society they recommend these simple tips:
1) Cover up
2) Use Sunscreen
3) Wear a hat
4) Wear sunglasses that block UV rays
5) Limit direct sun exposure during midday
6) Avoid tanning beds and sunlamps
7) Protect children from the sun

To read the full article click the link above. It is very informative, and I wish I would've read it before last weekend.

I hope everyone will be safe and protect yourselves!

Sunday, July 25, 2010

Card Challenge #6

So the challenge for this week is: theme: remember when, requirements: any type of nostalgic idea/feeling/sense you have, and at least 7 embellishments (for a collage feel).

I have to tell you this challenge was exetremly difficult for me, because I NEVER use this many embellishments on my cards! But it was also good, it took me out of my comfort zone and FORCED me to try something new. Which in my opinion, is always a good thing! So here is my take on the challenge:


 So the "remember when" theme that I was going for, was remember when we got married and everything was so cheerful and perfect. I tried to recreate the perfectness you feel then, and then you look back on your 50 years of happiness!

My seven embellishments are:
1. Brads
2. Prima Flowers
3. Paper Clippy
4. Eyelets
5. Ribbon
6. Buttons
7. See the leaf on the flower on the top left, not sure what it's called! :)
Check out what the other designers came up with this challenging challenge:

Dee Dee
Rachel May

Thanks for checking it out! I can't wait to see what Rachel May comes up with for our next challenge!

Saturday, July 24, 2010

Saturday Reads!

Hello Everyone! I have a brand new weekly post for you guys! It's called Saturday Reads! Every week I will showcase something out of a book that I've been reading and tell you about it.

So without further ado, here is the very first Saturday Reads, featuring Paper Transformed by Julia Andrus. From her book, I chose to do the frosted embossing. I have to tell you, this being my first time ever using Perfect Pearls, it was a challenge. They aren't as easy as one might think. However, after many failed attempts, here is what I came up with:


 MATERIALS:
-card stock
-Perfect Medium (I used VersaInk)
-embossing powder (I used Ultra Thick, the fine stuff doesn't work as well)
-Perfect Pearls (I used Forever Violet)
-stamp (mine is by Great Impressions)
-heat gun

INSTRUCTIONS:
1. Use the Perfect Medium to stamp an image.
2. Apply embossing powder, shake off the excess, and heat until glossy.
3. Immediately dust with Perfect Pearls to give the image a frosted look.
 This technique is really cool, and I can't wait to do it again, and make a card or something out of it.

Now all of you should give it a try! Let me know how it comes out and post up back here at SkyleRae's! I can't wait to see what you come up with!