Sunday, August 8, 2010

Card Club Challenge #8!

How are you guys loving these Card Club Challenges? I have to tell you, I think I may possibly becoming addicted to the challenges, they are so fun! I would like to see you guys play along as well! So in a comment send me a link to what you've created! I can't wait to see!

On to Challenge Number 8!!!! Now the last couple of challenges have been, for the lack of a better term, challenging, and I thought, what can I do to keep the bar set just as high? Well I came up with a great one (or I think so anyway)! Are you ready for this?

Challenge #8 is to create an anniversary card, BUT you HAVE to create your own background. No Designer Paper allowed in this challenge!!!! Now ladies I want your backgrounds to have some demension, not just plain, show me some texture and some beauty and most importantly let your creativity fly! I hope you are ready for this!

So I know you are all dying to see what I made:


Do you recognize the paper? Its from yesterdays post! I know you all we're just dying to know what I created out of that lovely paper that I made! So here it is!


Don't forget to check out the other Designers blogs:

Oh and Dee Dee you are the next designer for the next challenge, August 22! I can't wait to see what you ladies come up with!

To make my card I used:
-Plastic Wrap Paper (created by yours truly)
-Adornaments fibers
-Stampabilities Fresh Flower stamp
-Stampabilities Happy Anniversary stamp
-cardstock

Saturday, August 7, 2010

Saturday Reads!

So I'm running a little behind with this post! Ooops! I guess this day just kind of got a way from me! But that's alright once in awhile I suppose.
Well on to todays post, about what I keep calling "Plastic Wrap Paper" however, Julie Andrus, the author of Paper Transformed, calls it Watercolor Plastic Wrap Treatment. I have to tell you that I am LOVING this book, it has so many great ideas, and they are pretty simple as well, which is always a plus! So technique is pretty simple. Here it goes:

MATERIALS:
-watercolor paper
-watercolor paint
-art board or sturdy chipboard (I just used my scrapbooking mat)
-artist tape (I used masking tape, painters tape would work too)
-plastic wrap (I used the stuff straight out of the kitchen)
-round watercolor brush (#10 or #12) (use whatever you have on hand!)

INSTRUCTIONS:
1. Paint your paper with watercolors however you please!

 
2. While the paint is wet, lay the board flat, wrinkle the plastic wrap, and press into the watercolor.

3. Allow the paper to dray completely before removing the plastic wrap to reveal the design. (This is the hardest step!)

Tune in tomorrow to see what I made with this lovely paper! I cant wait to show you! I hope you are enjoying the Saturday Reads! Show me what you've create!

Friday, August 6, 2010

"That's What He Said" Fridays

Hey guys! It's Friday again! Yahoo! Here is my quote to inspire you through the weekend, I hope you enjoy and have a safe and happy weekend!

"In times of great stress or adversity; it's always best to keep busy, to plow your anger and your energy into something positive."
-Lee Iaccoca

I hope you are enjoying "That's What He/She Said Fridays"! Tune in tomorrow for Saturday Reads!

Thursday, August 5, 2010

Thursday Favs Presents...

...MONSTER COOKIES!!!

So before I show you and tell you how I made them, I have to tell you the story behind them, well making them this time anyway. At work one day we were talking about what our favorite cookies were (mind you we are all chomping down on amazing ranger cookies at the time!). And one of my coworkers said that she thought that these ranger cookies were her new favorite. To me, I was thinking these are pretty good, but they don't trump the monster cookie. So I mentioned that to my coworker, and to my surprise...SHE HAS NEVER HEARD OF A MONSTER COOKIE!!!! I quickly forgave her because she isn't from these Montana parts. So I took it upon myself to make her some monster cookies before she travels on her long journey back home.

So here is how to make these little lovelies!

INGREDIENTS:
3 eggs
1 1/2 cups packed brown sugar
1 cup white sugar
1 teaspoon vanilla extract
1 teaspoon corn syrup
2 teaspoons baking soda
1/2 cup butter (which convienently is one stick)
1 1/2 cups peanut butter
4 1/2 cups rolled oats
1 cup semisweet chocolate chips
1 cup candy-coated milk chocolate pieces (some may call these m&ms)


This is what my counter looked like with all the ingredients:


DIRECTIONS:
1. Preheat oven to 350 degrees F (175 degrees C)
2. In a very large bowl, beat the eggs (they aren't kidding here folks, you need a HUGE bowl!)
3. Add the remaining ingredients in order, mixing well (it gets tough towards the end)


4. Use an ice cream scoop to put on ungreased cookie sheet. Bake for 12 to 15 minutes.
5. CHOW DOWN!!!!!

I hope you enjoyed this recipe, and my coworker LOVED them. Which was a great self-esteem boost! Plus they are absolutely delicious! Oh and after looking at that ingredients list you are probably wondering how many it makes, not why they are called monster cookies. This recipe is supposed to yeild 72, I made mine a little bigger and got 36. It's totally up to you and how big you want to make yours!

Enjoy!

Wednesday, August 4, 2010

A Trip to...

...the Beartooth Mountains!!!! We went a few weeks ago and rode quads in the Beartooth Mountains, by the old Bendbow Mine. I thought that I would just show you some pictures for some eye candy! I hope you enjoy!


I hope you enjoyed the pictures! Have a happy Wednesday! :)

Tuesday, August 3, 2010

Challenge Tuesdays!

Hey guys! Are you loving this new schedule that I have? I am it sure is keeping me motivated! So for this Tuesday I did a challenge for the Christmas Stampin All Year Long Challenge! I just love these challenges, plus I'm thinking it will totally pay off come December when it's time to send out all those Christmas cards!

This week we had a sketch challenge! This was my first ever sketch challenge and it's definitely not as easy as it looks. But here is what I came up with:


To make my card I used the Paper Studio's Jolly Holiday Scrapbook Kit, both the paper and the sticker comes from this pack.


The brads are from my stash, not sure what brand they are.
You guys should play along too! Go to the Christmas Stampin All Year Long blog and check it out!

Hope you enjoy this challenge! And can't wait to see what you guys come up with!

Monday, August 2, 2010

Start Your Week Off Right!

(This is my own picture, please ask before you take it!)

This week I wanted to address the problem of soda/pop/cola, whatever you call it, most of America drinks at least one of them a day. And for what? I don't know about you, but pop does not agree with me. It makes my stomach and my whole digestive track upset, not to mention the bloating and how gross I feel after I have one. Plus, it doesn't do me any good to drink one anyway.

According to an article I found on Helium, "many soft drinks contain caffiene, we all know that but did you know that too much can lead to calcium loss. Which causes a whole load of other issues. Also, regular soda is LOADED with sugar, which has no nutritional value. The sugar in soda usually comes in the form of high fructose corn syrup (HFCS), which is suspected to have a whole myriad of other problems associated with it. And don't think if you drink the diet stuff you are doing yourself any favors. It contains artificial sweetners, which may increase your cravings for real sweets and junk foods."

To me this was a very informative article! I hope you all follow the link to the whole article and read it and learn from it as well. I don't drink pop that often, but when I do, I know I regret it! So from now on I'm going to try to completely quit drinking it. Try substituting things like juice, tea, and coffee for your pop cravings!

Hope this is helpful!

Sunday, August 1, 2010

Card Club Challenge #7 Results!

Rachel May sure gave us a challenge this week! Her challenge is to make a childrens birthday card, it must have some type of animal, AND you must stamp something on patterned paper! I have to tell you that it was not the easiest challenge. I actually struggled through it, but here are my results:


All my papers were from BasicGrey's max & wiskers paper pad.

The stamp is by Stampendous and the ink is by Martha Stewart.


I hope you enjoy! You should also check out the other designers results:

RachelMay

Dee Dee

Friday, July 30, 2010

"That's What He Said" Fridays

Welcome to another new post for the week! I am in LOVE with quotes! I have subscribed to Real Simple's Daily Thoughts, they send a quote every weekday (Monday through Friday)! And it totally rocks, such inspiration to start your day off with.


(Click the picture to link to the original owner)

Here is a quote from a couple weeks ago that I just loved:

"All great things are simple, and many can be expressed in a single word: freedom; justice; honor; duty; mercy; hope"
-Winston Churchill

I just love it and it is so true! I hope to inspire you all to have a happy day and weekend!

Wednesday, July 28, 2010

Fun with Mod Podge

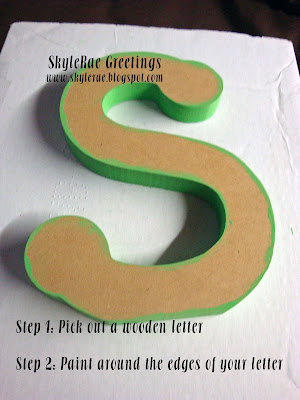
So I know you've been seeing them all over the place. Those cute little letters that are all fancy-fied, with paper, embellishments and Mod Podge! Well I decided hey that would look super cute in my very dreary and dull cubicle at work. And then I thought hey other people may want to know how I did this so I've included instructions!

MATERIALS:
-designer paper by Basic Grey Pheobe
-mod podge
-wooden letter
-acrylic paint
-hot glue
-fabric flowers (paper ones are good too!)


Here is my "S":


Step 5: Use your stencil to cut out various plain and patterned papers for your letter (I used 3, and forgot to take a picture of this step!)


To attach the embellishments I used hot glue, and just glued the separate layers together of the flowers and then the button on top and then stuck it to the "S". I also used hot glue to attach the ribbon to the back of the letter. It seems to have worked out just fine!

I hope everyone has enjoyed this little tutorial! And I really hope you enjoy making your own letters for you or your loved ones! They make excellent gifts!

Hope this makes everyone's hump day go by a little quicker so we can get to the weekend! And don't forget to post your projects back here so that I can go take a look at what you are creating!

Tuesday, July 27, 2010

Challenge Tuesdays!

Hey guys are you liking the new themes for the different days of the week so far! I am really enjoying posting about them! So as you can see Tuesdays are going to be about challenges! This Tuesday I chose to do the Christmas Stampin All Year Long Challenge!

I have been watching this challenge for a while now, so I think it's about time that I begin participating in the challenges! Plus there is no down side, I get my Christmas cards done throughout the year, rather than waiting until November, or dare I say it December!

This weeks challenge is to use buttons and bows as your embellishments! How cool is that! I had a lot of fun with this challenge so here is my take on it:


 To make my card I used:
-designer paper by the Paper Studio
-cranberry ink by Color Box
-ribbon from the stash
-holographic embossing powder
-buttons from my stash


This challenge was a lot of fun, and it gave me a chance to practice my bow makin' skills! I'm getting pretty good if I do say so myself!

One day I will have to post a tutorial on how I do my bows! But that's another day.

Hope you enjoy!


Hope you guys will check out the Christmas Stampin All Year Long blog and participate too!


Monday, July 26, 2010

Start the Week Off Right

I've got another surprise for you all! Another new series for you guys, I'm going to call it "Start the Week Off Right!" And every week I will give you a health tip, beauty tip, or recipe! I'm really excited to start this off. So I will start this series off with a little sun safety!

I have to tell you where this comes from. Last weekend we were out 4-wheeling in the mountains, and dumb dumb me didn't wear sunscreen. It was very stupid of me and trust me I have painfully paid for it!

According to the American Cancer Society they recommend these simple tips:
1) Cover up
2) Use Sunscreen
3) Wear a hat
4) Wear sunglasses that block UV rays
5) Limit direct sun exposure during midday
6) Avoid tanning beds and sunlamps
7) Protect children from the sun

To read the full article click the link above. It is very informative, and I wish I would've read it before last weekend.

I hope everyone will be safe and protect yourselves!

Sunday, July 25, 2010

Card Challenge #6

So the challenge for this week is: theme: remember when, requirements: any type of nostalgic idea/feeling/sense you have, and at least 7 embellishments (for a collage feel).

I have to tell you this challenge was exetremly difficult for me, because I NEVER use this many embellishments on my cards! But it was also good, it took me out of my comfort zone and FORCED me to try something new. Which in my opinion, is always a good thing! So here is my take on the challenge:


 So the "remember when" theme that I was going for, was remember when we got married and everything was so cheerful and perfect. I tried to recreate the perfectness you feel then, and then you look back on your 50 years of happiness!

My seven embellishments are:
1. Brads
2. Prima Flowers
3. Paper Clippy
4. Eyelets
5. Ribbon
6. Buttons
7. See the leaf on the flower on the top left, not sure what it's called! :)
Check out what the other designers came up with this challenging challenge:

Dee Dee
Rachel May

Thanks for checking it out! I can't wait to see what Rachel May comes up with for our next challenge!

Saturday, July 24, 2010

Saturday Reads!

Hello Everyone! I have a brand new weekly post for you guys! It's called Saturday Reads! Every week I will showcase something out of a book that I've been reading and tell you about it.

So without further ado, here is the very first Saturday Reads, featuring Paper Transformed by Julia Andrus. From her book, I chose to do the frosted embossing. I have to tell you, this being my first time ever using Perfect Pearls, it was a challenge. They aren't as easy as one might think. However, after many failed attempts, here is what I came up with:


 MATERIALS:
-card stock
-Perfect Medium (I used VersaInk)
-embossing powder (I used Ultra Thick, the fine stuff doesn't work as well)
-Perfect Pearls (I used Forever Violet)
-stamp (mine is by Great Impressions)
-heat gun

INSTRUCTIONS:
1. Use the Perfect Medium to stamp an image.
2. Apply embossing powder, shake off the excess, and heat until glossy.
3. Immediately dust with Perfect Pearls to give the image a frosted look.
 This technique is really cool, and I can't wait to do it again, and make a card or something out of it.

Now all of you should give it a try! Let me know how it comes out and post up back here at SkyleRae's! I can't wait to see what you come up with!

Monday, June 28, 2010

Challenge Number 5!

Here is the challenge for the next two weeks! Here's the preview:


 Now for the challenge: Your card must be black, white, and one other color. My other color of course was teal.

I created my card by first taking a piece of black cardstock, embossed it with my cuttlebug, and swiped white ink over the embossed parts to bring out the embossing some more. Then I added a prima flower with a brad! It's simple yet elegant!


Now, I can't wait to see your take on this challenge! They are due by July 5th! Can't wait to see your wonderful creations!

Check out the other team members Rachel May and Dee Dee!


EDIT: TAG YOUR IT DEE DEE!